Thursday, February 28, 2013

Deviled Chicken Thighs

In our household, as with many households, chicken makes an appearance on our table at least once a week.  The trick is keeping it interesting. 

This recipe came to me one morning while walking on the treadmill and watching the today show.  I had some chicken thighs in the refrigerator that I knew I would be cooking that evening.  I am sure I had some plan for them such as my over used oven fried chicken recipe, but the cooking segment gave me a fresh idea.  A chef was making a chicken dish and I would link to it, but I can't find it. Anyway this isn't her recipe, she used different ingredients, but it is her method, which I thought was genius. Now I know stuffing seasonings under the skin of the chicken isn't a new thing, I 've done it for years with the whole bird. But I have to confess, as much as I like cook and experiment, I never thought about stuffing seasonings under the skin of individual chicken pieces.

I started to think about a wonderful deviled chicken recipe that I used to make. I stopped making it because it contained tons of butter, plus it required several trips to the oven to baste the chicken during the roasting time. I decided to utilize the method I had just watched on the Today Show to recreate the essence of the deviled thighs recipe without all the butter and forget the basting!

This is a great go-to dinner party dish to have in your back pocket.  It is an attractive dish that is quite tasty, it allows for easy serving since it is individual pieces, most of the work (what little there is) can be done early in the day, and it can be mostly ignored while you are entertaining your guests.  Really, it is EASY and DELISH, great qualities for a dinner party dish or a even a quick week night supper.

When it comes to chicken pieces, unless I am specifically making spicy wings for football snacking, I tend to gravitate to thighs. I find them easy to deal with and I like the meat better than breasts. So many of the chicken dishes I post here will be made with thighs. For the most part, if you prefer breasts you can easily swap them for the thighs.

Deviled Chicken Thighs

5-6 chicken thighs

Marinade:
3/4 cup fresh parsley, chopped
juice of 1 lemon
3 cloves garlic, pressed
1 tablespoon grainy mustard
4 tablespoons olive oil
1 teaspoon kosher salt
1/8 teaspoon black pepper

Mix marinade ingredients in a bowl.

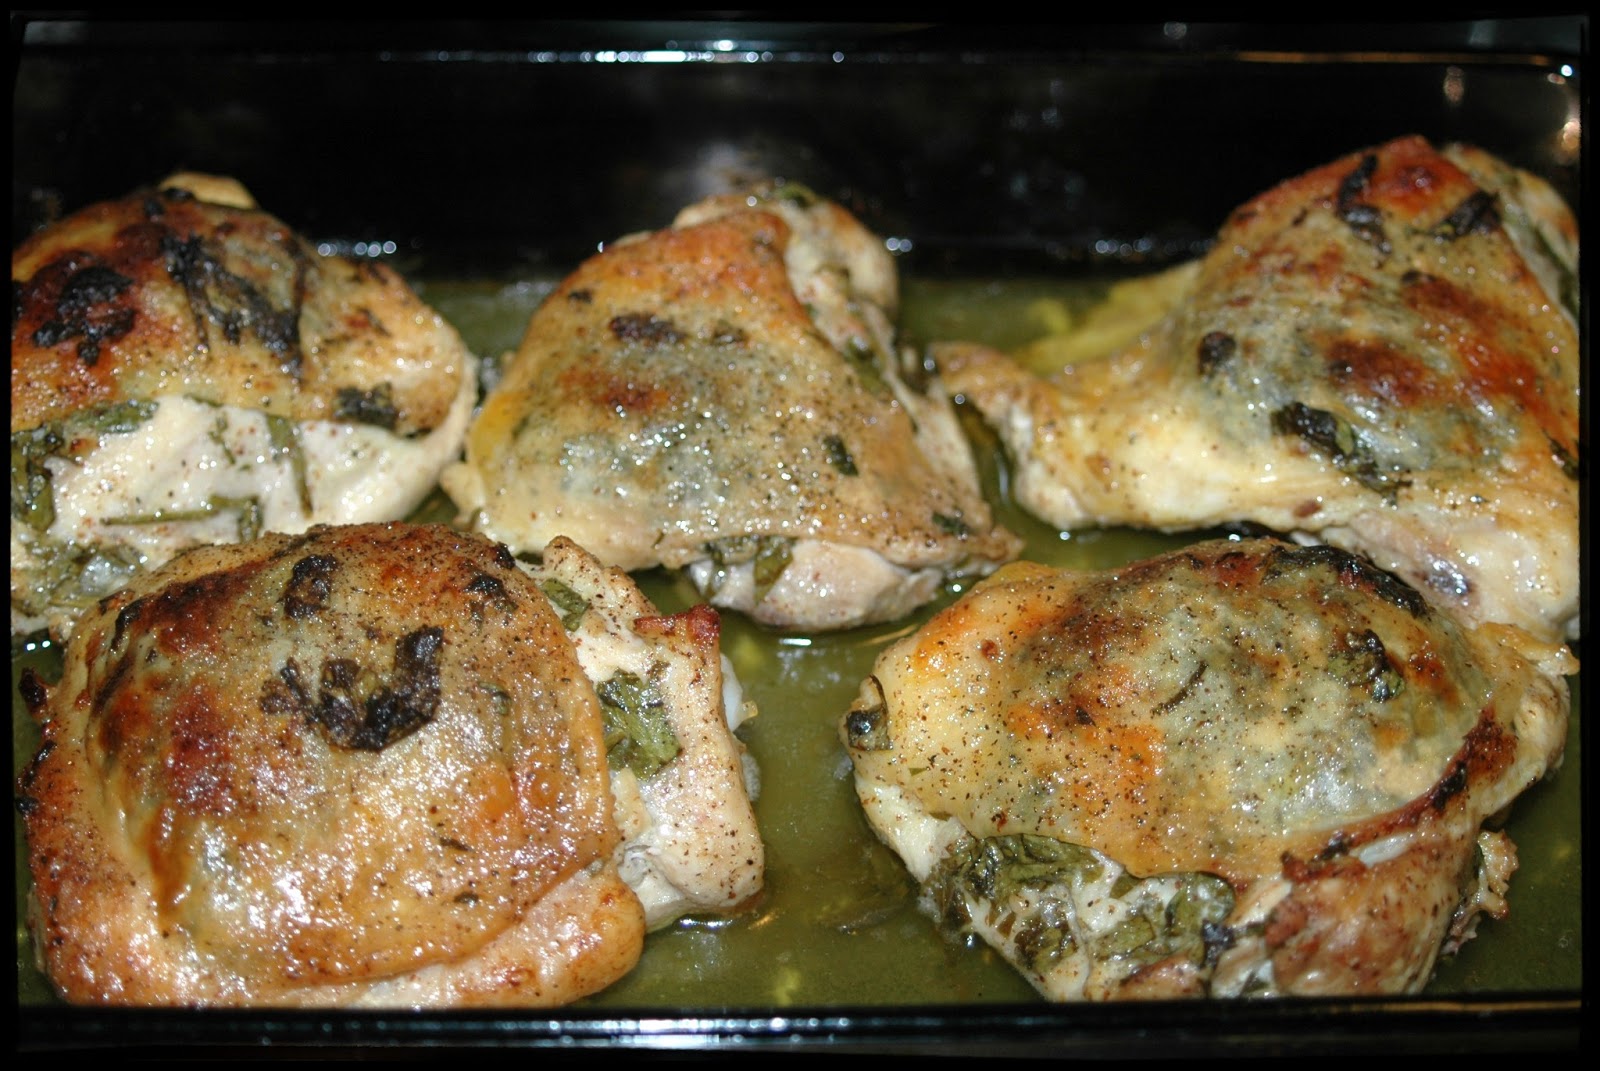
Wash thighs and trim excess fat and skin.  Find a spot on the thigh and carefully run your finger under the skin to create a pocket. 

Put about a tablespoon or two of the marinade in each pocket.  Then put the thighs in a zip lock bag and pour in any remaining marinade. 

Refrigerate for at least a half an hour, but several hours is even better.

Preheat oven to 425 degrees. Arrange the chicken thighs in a roasting pan. Roast for 20 minutes, then reduce the heat to 400 degrees and cook another 25 minutes.


A quick weeknight supper:  Deviled Chicken Thighs, Sauteed Fresh Spinach and Oven Baked Sweet Potato Fries

Tuesday, February 26, 2013

Enchiladas with Poblano Sauce

I love enchiladas, it doesn't matter whether they are filled with chicken, cheese, beef, veggies, or whatever.  The thing that really makes a good enchilada is the sauce.  You've got to have a great sauce.  There is a restaurant near us called Azucar that does it right.  They have the most wonderful spinach enchiladas.  They are stuffed with fresh spinach and have this incredible light green creamy sauce. I have no idea what is in the sauce, but after searching high and low on the Internet, I found an enchilada recipe made with a poblano pepper sauce by Rick Bayless that seemed to be the place to start.

This recipe is fairly simple, but one of the things that put me off was blackening the peppers.  I don't know why, it's really very easy but something I never do.  Maybe it's because I don't have a gas stove or oven, so blackening without a real flame seems to be a challenge. When shopping for my ingredients I was really hoping to find some canned poblanos so I could skip it.  Fortunately, I did not find the canned poblanos and ended up blackening the fresh peppers on the broil setting in my electric oven.  It worked out just fine and now that I have had it, I think this sauce would have been compromised had I used canned instead of fresh.  Although, if this process will stop you from trying this recipe, I say go ahead a use canned peppers.

The original recipe is for chicken enchiladas, but my goal was to replicate the spinach enchiladas from Azucar.  I knew that spinch filled enchiladas would not go over big with my daughter, so I decided to make half the pan spinach, and then use some leftover roasted chicken to make the other half of the pan chicken.  You can do the same, or double either of the filling recipes for a whole pan of one type.

Enchiladas with Poblano Sauce
 
Enchilada Sauce
2 fresh poblano chilies

1 1/2 cups spinach leaves, chopped
2 cups milk
14 oz vegetable broth
6 tablespoons olive oil
3 garlic cloves, pressed
1/2 cup flour
2 teaspoons kosher salt
 
Spinach Filling
2-3 tablespoons olive oil
2 cloves garlic, pressed
large bag of spinach, washed and lightly chopped
shredded monterrey jack cheese

Chicken Filling
leftover roasted chicken (about 1/2 med. chicken), meat only shredded
1/2 - 3/4 cup sour cream
shredded four cheese mexican blend

12 corn tortillas
fresh salsa


Roast the poblanos on a baking sheet 4 inches below a broiler, until blackened and blistered all over. Remove from oven and cover with a damp paper towel until cooled. 
 
Once cool rub off the blackened skin and remove the stem and seeds. Rinse the pepper pieces, chop them in large pieces and place them in the food processor along with the 1 1/2 cups spinach.
 
Heat the olive oil in a large saucepan over medium heat. Add the garlic and cook for a minute then whisk in the flour for another minute.  Add the veggie broth and then the milk and turn the heat up to medium-high. Whisk the mixture constantly until the sauce comes up to a boil. Reduce heat to medium-low and simmer for 5 minutes. Remove from heat.
 
Pour about half the milk mixture into the food processor with the chilies and spinach and pulse until smooth. Pour the mixture back into the saucepan with the remaining sauce. Season with kosher salt and set aside.
 
In a large frying pan or wok, heat the olive oil for the spinach filling.  Add the garlic and saute for 1 minute, add the spinach and stir-fry until wilted. Set aside.
 
In a bowl mix the shredded chicken with enough sour cream to moisten. Set aside.
 
Preheat oven to 350 degrees.
 
Wrap the flour tortillas in damp paper towel and heat in the microwave for 1-3 minutes.
 
Spray 9x13 inch baking dish with PAM or other spray oil and ladle a small amount of the pepper sauce into the bottom.
 
Working with on tortilla at a time, sprinkle about 2 tablespoons of cheese down the center of the tortilla and then about 1/2 cup of the filling.  Roll the tortilla up and place seam side down in the pan.  This recipe should make 5-6 or each type.
 
Pour the remaining sauce over the enchiladas. Sprinkle with any remaining cheese and bake 25 - 30 minutes until hot and bubbly.
 
Serve with fresh salsa.


Saturday, February 23, 2013

Erik's Slow Roasted Chicken

Is it funny to name a recipe after the person who told you about it?  I mean it's not even his creation, but since I had never cooked chicken like this and my friend Erik is the one who gave me the low down on it, in my mind it is filed away as Erik's Slow Roasted Chicken.

I am constantly seeking out new recipes, but some of the best ones just find their way to you.  This is one of those recipes.  It came up in casual dinner conversation and now that I have made it, I know it will be a go to recipe for years to come. Since this was a casual conversation, I do not have exact measurements, and really it's not so much about the exact seasonings and amounts, it's about the method.

What I love about this recipe is the the low and slow process. It is almost like crock pot cooking in your oven yet without the excess moisture, so maybe it is even better, especially for chicken.  Like crock pot chicken this is fall apart, tender and juicy chicken, but unlike crock pot chicken, this chicken has a nice crispy exterior.  By the way, Erik recommends using chicken thighs instead of breasts, because breasts could dry out.  Very set it and forget it.  Give it try, I know you'll like it.

Erik's Slow Roasted Chicken
6 Servings

6 Chicken thighs
1 onion, sliced
2 cloves garlic, pressed
garlic salt
salt
pepper
celery salt
Olive oil

Place chicken thighs, onions and garlic in a casserole dish. Sprinkle with desired amount of garlic salt, salt, pepper and celery salt.  Drizzle some olive oil over the chicken.  Roast, uncovered at 250 degrees for 2 1/2 hours.

Nutritional Information (from MasterCook):

Per Serving: 227 Calories; 17g Fat (66.8% calories from fat); 17g Protein; 2g Carbohydrate; trace Dietary Fiber; 79mg Cholesterol; 401mg Sodium.  Exchanges: 0 Grain(Starch); 2 1/2 Lean Meat; 1/2 Vegetable; 2 Fat; 0 Other Carbohydrates.


Thursday, February 21, 2013

Quick Flat Bread Pizzas and Zucchini Carpaccio Salad

I love to cook, but sometimes I don't feel like it.  Sometimes the afternoon/evening schedule is so crammed that meal preparation needs to be quick.  Working moms would say that is every night for them.  When planning the weekly menu, I try to work in at least one or two easy meals.  Sometimes that means leftovers, which of course is one the easiest ways to go, but there are other simple meals that I keep up my sleeve. One is flatbread pizza.  I use store bought flatbreads and pizza sauce to simplify the process. My current favorite flatbread is Flatout Bread.  Making pizza dough is a fairly simple process, but this is even better for pizza in minutes.

Another thing I love about this meal, besides it being so simple of course, is that I can customize each person's pizza, easily making each member of my family happy.  Gigi loves cheese and turkey pepperoni, Paul wants cheese, basic veggies and pepperoni, I love lots of veggies, whatever yummy gourmet cheeses I can find in the refrigerator and jalapeno slices!

The Flatout crusts need about 5 minutes in the oven prior to adding your sauce and toppings.  After that go to town.  Simple pizzas will need another 7 minutes or so to bake and pizzas with tons of veggies need12-15 minutes.

To round out the meal, I like to add a salad.  I saw the inspiration for zucchini carpaccio salad on Pinterest.  The link took me to a page called Proud Italian Cook, she gives the basic ingredients, which I mostly follow but I do it my own way of course.  What I love about this salad are the thin slices of zucchini, and the slivers of fresh parmesan reggiano!

Zucchini Carpaccio Salad

baby greens
zucchini sliced on mandolin
pecans
parmesan reggiano cheese

1 T. lemon juice
2 T. white wine vinegar
5 T olive oil
salt
pepper

Sunday, February 17, 2013

Chicken Ga Kho over Sauteed Napa Cabbage and Rice

A friend of mine posted this recipe from The Ravenous Couple on facebook a while back.  I made it several times and then forgot about it.  Last fall we got a head of napa cabbage in our CSA box and I needed to figure out what to make with it.  The chicken ga kho recipe popped into my head, which is funny since the orginal recipe does not contain cabbage.

I tried to think of why I stopped making it.  I think it was the cooking process, specifically caramelizing to the end on the stove was too much frying for me.  So I decided to make a few modifications to the process.  I thought about the way I cook steak, get the good sear then finish it in the oven.  I thought I would adapt that process for this chicken. Once I caramelized the chicken on both sides, I would put it in the oven to finish cooking.  I also decided I would leave the skin on.  While the original recipe is super good, I really like the modifications I made, and think it helps keep the chicken moist and juicy.

Let's get back to the cabbage, because that's the whole reason I decided to revisit this recipe in the first place.  The original recipe is served over rice, so in my mind it was in desperate need of a veggie.  I am sure I served some sort of veggie on the side when I made it before, but my new plan was to make it a complete creation. Slicing and stir frying the cabbage is a quick process that can be done while the chicken is finishing in the oven. So now if I plan to make the chicken, I also pick up a head of napa cabbage, they are permanently wedded in my mind

While it may seem that there are a few steps and three pans, this dish comes together very easily and will look and taste like it took much more effort than it actually does.

Caramelized Chicken Ga Kho over Sauteed Napa Cabbage and Rice
Adapted from The Ravenous Couple's Caramelized Chicken Ga Kho

Servings: 6

Marinade
2 tbs  fish sauce
1 tb  brown sugar

6 chicken thighs
 
Sauce
3/4 cup  brown sugar
1/3 cup  fish sauce
1/3 cup  rice vinegar
1/3 cup  water
4 cloves  garlic -- pressed
2 tbs  ginger -- grated
2 shallots -- minced
2 jalapeno peppers, sliced (remove seeds for mild, keep the seeds for hotter)
2 green onions, sliced
pepper

2 tbs  olive oil

Sauteed Cabbage
1 tablespoon  olive oil
2 cloves  garlic -- pressed
1/2 tablespoon  ginger -- grated
1 head  napa cabbage -- thinly sliced
1 tablespoon  soy sauce
1/2 teaspoon  sesame oil

1 cup jasmine rice

Combine 2 tbs of fish sauce and 1 tbs brown sugar.  Put chicken in a plastic zip lock bag and add the marinade.  Marinate in the refrigerator for at least a half hour.

Combine remaining brown sugar, 1/3 cup water, rice vinegar, and fish sauce and mix until the sugar dissolves. Add the ginger, shallots, and garlic.

Put the rice and 2 cups water in a rice cooker and set to cook.

Preheat the oven to 350 degrees.

Heat a large oven safe pan on high with olive oil and add the chicken skin side down.

Allow to brown without touching them for a minute or so and then pour in about 1/4 of the sauce. Do not move the chicken.

Let the sauce begin to thicken and the chicken will brown after a few minutes.

Once it is caramelized, turn the pieces of chicken over and pour in the rest of the sauce. Add the chilies and green onions and pepper to taste. Transfer to the oven to finish for 20 minutes.

Meanwhile, heat 1 tablespoon of olive oil in a wok and add the garlic and ginger.  Cook for about 1 minute.

Then add the napa cabbage and stir fry until wilted.

Dress with soy sauce and sesame oil.

Serve the cabbage on the rice and then place chicken thighs on top.  Drizzle the sauce over the top.


Per Serving: 599 Calories; 25g Fat (36.7% calories from fat); 19g Protein; 76g Carbohydrate; 1g Dietary Fiber; 82mg Cholesterol; 264mg Sodium.  Exchanges: 1 1/2 Grain(Starch); 2 1/2 Lean Meat; 1/2 Vegetable; 3 1/2 Fat; 3 Other Carbohydrates.


Friday, February 15, 2013

Winter Greens Pesto Topped with Cilantro Lime Shrimp

Like many of my foodie friends, one of my guilty pleasures is Pinterest.  I could surf the site all day long looking for new food ideas. One that recently caught my eye was for winter greens pesto.  The picture of the green coated noodles just looked super yummy.  Once I explored the recipe on a web site called theKitchn and found that the green used was kale, a hard won new favorite of mine, I decided it was worth a try.

First, I guess I should explain hard won.  I know it's crazy but up until recently, I never even considered buying kale.  It just wasn't on my list of commonly used veggies.  My sister-in-law made kale chips for us once, and although they were quite tasty, I still didn't get into kale exploration.  It wasn't until I signed up for a weekly delivery of veggies from our local CSA that I got into kale.  This is surprising because our first try was rough.  I sauteed/steamed it with olive oil and garlic the way I sometimes do with spinach, and due to its strong flavor and tougher texture it was not a hit at the dinner table.  A few tries and a few varieties later I learned how to finesse kale and get my family to not only eat it, but to enjoy it.


Hence, my thrill when learning this pesto recipe was wrapped around using kale.  I immediately put it on the menu plan and even though on its own this is a great vegetarian dish, we already had several vegetarian nights planned so I decided to utilize some shrimp that I had in my freezer. 

I followed the Kitchn's recipe very closely, which is actually a bit unusual for me.  I was loosey-goosey with the measurements because I have no idea how much my batch of kale weighed, so I used the whole thing.  By the way I used lacinato kale (I've also heard it called dinosaur kale) which is a more textured variety (sort of like dinosaur skin,) than the ruffly stuff you usually see in the grocery store.

I was thrilled when I scraped it out of the food processor to find this lovely green potion for pasta.  What I liked even better was that I made it early in day, making the night's dinner preparation much easier. 

The shrimp piece was just as simple.  I peeled the already deveined shrimp and threw it in a zip lock bag with the marinade ingredients and let it sit in the refrigerator until the pasta was boiling.  A quick stir-fry and dinner was ready. 

My child who hates tomato based sauces, go figure my Italian genes must have gotten lost in her DNA, loved this dish. Plus, this recipe made a ton so I have plenty to save. Maybe I'll put some on tonight's pizza!  The rest I will freeze for another time.  We'll keep this one in the rotation.

Since I have not made any changes to the winter greens pesto recipe I am going to direct you to the original posting at theKitchn.

Winter Greens Pesto Topped with Cilantro Lime Shrimp

Winter greens pesto
1 lb Linguine
2 lbs large shrimp, peeled and deveined

Marinade:
Juice from 2 limes
2 tablespoons Cilantro, chopped
1/3 cup oil oil
2 tablespoons water
salt and pepper to taste

Make the Pesto and store it in the refrigerator until needed.

Combine the marinade ingredients.  Pour the marinade over the shrimp and refrigerate for several hours.

Boil the water for the pasta, salting generously. Meanwhile, heat a wok or large pan to stir fry the shrimp. Once the pasta is boiling, add the shrimp to the wok (discarding the excess marinade,) and quickly stir fry until the shrimp turns pink.  Drain the pasta (leaving a few tablespoons of the water) and toss in the desired amount of pesto, transfer to a serving bowl and top with the shrimp.

Thursday, February 14, 2013

Glazed Flourless Chocolate Torte


I am breaking from tradition.  For a number of years now, I have baked a batch of luscious red velvet cupcakes for Valentine's Day. A semi-homemade affair, but they are soft, moist and delicious. For some reason this year, I am just not feeling it.  I got up this morning with red velvet cupcakes on my to do list, when all of the sudden it hit me.  I don't really want them and I mean really, if you are going to indulge in massive dessert calories, you should at least really want it. 

So the question for the morning became what do I want, and will it work for my 9 year old daughter who has come to expect red velvet cupcakes on Valentine's Day. I know I want something decadent and chocolaty, and realize the perfect treat would be a flourless chocolate torte, because who needs all that flour in there lightening up the chocolate flavor!  I casually ask Gigi if that would work for her, knowing it certainly would.

So after my trip to gym, I plan to head to the grocery store and pick up my ingredients.  I am really happy I decided to go to the gym, and I'm not talking about the part where I burn up enough calories to make up for ones I would consume with the torte.  Because really that would take all day. While I was there, I caught a cooking snippet on the Today show with a celebrity chef who was making a bunch of stuff that I was not interested in, but there was on thing she had that I did like.  She made these little heart shaped candies out of candy melts to add some bling to her dessert.  Okay, add a trip to Michael's to pick up candy melts and a mold.

A quick look through a cookbook and a web search gave me all the info I needed for my torte.  I found a recipe at About.com that would serve as my foundation.  I increased amounts because I had a larger pan and swapped out some of the semi-sweet chocolate for bittersweet. 

This torte is so easy to make, it may become one of my go to desserts, especially for a pot luck.

                     
Glazed Flourless Chocolate Torte

Serves 10

Torte
5 ounces  semisweet chocolate -- coarsely chopped
4 ounces  bittersweet chocolate -- coarsely chopped
3/4 cup  butter
1 cup  sugar
5 large  eggs
3/4 cup  cocoa
1 1/2 teaspoons  vanilla
                       
Glaze
3 ounces  semisweet chocolate -- coarsely chopped
2 1/4 tablespoons  butter
2 1/4 teaspoons  milk
2 1/4 teaspoons  agave syrup
1/4 teaspoon  vanilla

3 ounces  candy melts

Preheat oven to 350°F

Line the bottom of a 9 inch springform pan with parchment paper and spray the paper.

Put the 5 ounces of semi-sweet chocolate, 4 ounces of bitter sweet chocolate and butter in a microwave safe bowl. Melt in microwave stirring every 15 seconds until smooth.

Add sugar and return the bowl to the microwave for 3-4, 15 second intervals, until the sugar starts to dissolve.

Add each egg, one at time whisking thoroughly.

Sift the cocoa into mixture and whisk until incorporated. Stir in the vanilla.

Pour batter into prepared pan and bake in preheated oven for about 25 minutes. The center of the torte should be just firm to the touch, do not over bake.

Cool in the pan on a wire rack for 15 minutes, then remove the outside of the pan. The original recipe says to invert it, but I smell disaster so it will stay on the botton part of the springform pan.

Meanwhile melt the candy melts in the microwave 15 seconds at a time until smooth.  Pour into molds and refrigerate.

Put the remaining chocolate and butter in a microwave safe bowl. Melt in microwave stirring every 15 seconds until smooth.

Add the milk, agave syrup and vanilla and stir until smooth and glossy.

Let the glaze cool for a few minutes then pour over the middle of the torte.

Evenly spread the glaze over the cake, letting it run down the sides of the torte.

Decorate glazed torte with candies.
                                    - - - - - - - - - - - - - - - - - - -

Nutritional Analysis (from Mastercook)

Per Serving (Minus candy melts): 449 Calories; 33g Fat (59.8% calories from fat); 7g Protein; 43g Carbohydrate; 4g Dietary Fiber; 150mg Cholesterol; 208mg Sodium.  Exchanges: 1/2 Grain(Starch); 1/2 Lean Meat; 0 Non-Fat Milk; 6 Fat; 2 1/2 Other Carbohydrates.


Tuesday, February 12, 2013

Blueberry Apple Crisps

My daughter has been off on a tangent lately about how we don't eat "regular food." This doesn't bother me because I know we eat well, meaning tasty foods that are usually on the healthier side of the spectrum. Don't get me wrong, we eat things that aren't necessarily healthy sometimes, especially because I think a wide variety of foods is important. But more and more the focus is on more fruits and veggies to balance out the less than healthy foods. Today's recipe is example of that balance, sure there is a good bit of sugar in here, but we also have fresh blueberries and oatmeal.

Yesterday she was sitting at the kitchen table making long work of her easy homework when she realized I was making something.  Of course she wanted to know what it was and I told her it was dessert for later. This got her attention and she jumped up to come over and check it out.  Even though she loves fruit, she saw the blueberries and apples in the bowl and decided it wasn't going to be her idea of dessert, and I got "why can't we have regular dessert?"

Well, first of all this isn't even something strange, it's just a fruit crisp. Second of all, this is one tasty dish. It's a modification of a recipe I pinned from about.com. For the most part I follow the recipe, but I do have a few modifications. First of all the original recipe is for blueberry crisp. I didn't have enough blueberries, but I did have a few granny smith apples, so I made up the difference with apple cubes roughly the same size as the blueberries. Second, although I have nothing against butter, I only used 2 tablespoons and then added in 2 tablespoons of coconut oil, because really, the more coconut oil I can get into our diet the better. Third, I like the fun and exactness of individual portions, and therefore put mine in 6 ramekins. Oh yeah, and I cut back on the sugar just a bit.

How did it turn out?  The dessert was hit. Gigi had to confess it might have been the best dessert ever. Yup, Score!


Blueberry Apple Crisp

Serving Size : 6

1 pint fresh blueberries - washed, drained well
2 medium granny Smith apples - peeled, cored and cubed
3/8 cup sugar
1 tablespoon cornstarch
1 teaspoon lemon juice
1/3 cup brown sugar
1/2 teaspoon cinnamon
1/3 flour
3/4 cup oatmeal
pinch kosher salt
2 tablespoons butter - softened
2 tablespoons coconut oil - softened


Preparation:

Preheat the oven to 375 degrees.

Combine the blueberries, apples, granulated sugar, corn starch, and lemon juice in a large bowl and mix to combine evenly. Divide fruit into lightly oiled individual ramekins.

In the same bowl, combine the remaining ingredients and stir together until the mix is evenly blended. Sprinkle the mixture over the fruit and bake for 20- 30 minutes.


Nutritional information form Mastercook:

Per Serving: 269 Calories; 9g Fat (30.0% calories from fat); 3g Protein; 46g Carbohydrate; 4g Dietary Fiber; 10mg Cholesterol; 47mg Sodium. Exchanges: 1 Grain(Starch); 1 Fruit; 2 Fat; 1 1/2 Other Carbohydrates.

Monday, February 11, 2013

Vegetarian Enchiladas


Lately I have been working towards eating less meat. A lot less meat. I don't feel like I want to go completely vegetarian, and certainly not vegan, because I love dairy, but I do believe the American diet is heavy on the meat. My body feels lighter when I eat less meat, but I can also say that a good reasonable portion of meat after a few days of vegging it, also makes me feel good. I am looking for balance.

My daughter complained bitterly about this the other night over our dinner of vegetarian enchiladas and rice. She wanted to know why we couldn't just eat regular food like other people. Which of course I thought was very funny, because really, what is regular food?

My feeling is that Americans eat a lot of processed foods. The largest sections of the grocery store are the isles and frozen food sections. Don't get me wrong, I shop in the isles too, but I really try to focus on the outskirts of the store, especially the produce section. So I guess this post isn't just about less meat, it is also about less processed food.

With that said, as I work to incorporate new meals into our diet, I am trying to focus on less processed foods and meat. One of the new stars on our menu is a vegetarian enchilada recipe that I found through Pinterest. The post links to a blog called Word of Wisdom Living, and gives a version of a Martha Stewart recipe. I, because I cannot seems to follow any recipe by the letter, have revised this recipe to meet my tastes. Although I have no issues with Martha's pantry version, it's still a good healthy choice, I find mine to be much more interesting.

Kohlrabi
One of the most interesting ingredients is kohlrabi. What the heck is that? Well as much as I like my veggies, and even though I feel like I at least heard or read the word before, I had no idea of what it was when it showed up in my CSA box this past fall. I decided that I would peel and cube it, then roast it in olive oil with salt and pepper and then use it to replace the corn in Martha's recipe. This is how I stumbled onto how wonderful this recipe is and how I learned that I love kohlrabi. of course, if kohlrabi is not your thing, you could easily substitute yellow squash or zucchini.  Any of the veggies in this recipe could be swapped out for something different.

Another note, this time about the the beans in this recipe, I start with dry great northern beans. You can used canned beans, either black, pinto, great northern, whatever you like, but I find that nothing beats soaking and cooking your own. It takes very little hands on time and if you do the whole bag you can keep the extras in the refrigerator for use in another, possibly vegetarian meal.

Vegetarian Enchiladas

Number of Servings: 7

Enchilada Sauce:
3 tablespoons olive oil
1 1/2 teaspoons ground cumin
1/2 cup flour
1/2 cup tomato paste
32 ounces organic vegetable broth
Salt and pepper

Enchiladas:
1 kohlrabi, peeled and cubed
1 Italian eggplant, peeled and cubed, slightly larger than the kohlrabi
1 1/2 tablespoons olive oil
6 cups fresh spinach, rinsed and roughly chopped
2 cups Monterrey jack cheese, grated
2 cups great northern beans
3 green onions -- thinly sliced
1 tsp cumin -- ground
2 tablespoons pickled jalapeno pepper slices
14 each corn tortillas

Directions:

Preheat oven to 375 degrees. Toss the cubed eggplant and kohlrabi with olive oil and salt and pepper to taste. Spread cubes onto a large baking sheet and roast for 20-30 minutes until tender, rearranging midway through cooking time.

Make the sauce, this is directly from Martha Stewart's recipe "In a medium saucepan, heat olive oil and add cumin, flour, and tomato paste. Cook 1 minute, whisking. Whisk in broth and ¾ cup water. Bring to boil and then simmer until slightly thickened (5-8 min.). Salt and pepper, then set aside."

Meanwhile steam spinach for 10 minutes and preheat your oven to 400 degrees.

Put the filling together in a large bowl. Combine beans, spinach, kohlrabi and eggplant, green onions, jalapeno slices, cumin, 3/4 of the cheese, and salt and pepper to taste.

Heat the tortillas wrapped in a damp paper towel and warm 1-3 minutes in the microwave. (I have to say I am reconsidering this method of heating the tortillas, but right now this is how I am doing it.)

Fill each tortilla with filling, roll tightly, and arrange in a lightly oiled baking dish with the seam down.

Cover enchiladas with the sauce and top with remaining cheese.

Bake 15-20 minutes, uncovered, until sauce is bubbly.

Nutritional Analysis (from Mastercook): Per Serving : 640 Calories; 23g Fat (31.0% calories from fat); 28g Protein; 85g Carbohydrate; 18g Dietary Fiber; 30mg Cholesterol; 1242mg Sodium.  Exchanges: 5 Grain(Starch); 2 Lean Meat; 2 Vegetable; 3 1/2 Fat.

Sunday, February 10, 2013

Union Market

Welcome to my new blog, and the tongue and cheek reference to magic and witchcraft.  What I do in my kitchen sometimes seems magical and other times well, let's just say definitely not magical. Regardless, I love the thrill of putting the ingredients in the pot and discovering the results.  For those of you who have followed posts from Mikostinko, this is blog will take over from where Mikostinko left off, but with a slightly more appropriate or at least understandable name.  It will continue the quaint little homegrown blog feel, meaning no fancy food stying pics, just whatever I can get at the moment with my Nikon or iPhone, sometimes glitzed up with Instagram.  Fancy, I know, but that's how I roll.


Buffalo and Bergen's Steamer
As for postings, in the past I have hesitated to post many cooking creations mostly due to the fact that I followed someone else's recipe.  No more, if it's good I am posting it, with proper credit to the original author of course.  Although, I can take no blame if they plagiarized someone else, something I see a lot of on the great, wild Internet.  
My first post is not a about a recipe, but a foodie trip to a fairly new market in the DC Metro area called Union Market. The market is located at 1309 5th Street, NE and unlike many places in the city has ample parking! There are a number of very interesting artisans doing business in the market and I hope to see more added.
Red Apron Butchery
Our first stop was Buffalo and Bergen, I had heard about their steamers on the radio and this was the catalyst for the whole trip.  I have to say I was definitely not disappointed.  What is a steamer, you ask?  It starts with some ice cream and chocolate syrup in a cup, to which steaming hot chocolate is poured over top.  The garnish is a small stem of flaming mini marshmallows.  So, so good. 


After filling up on knishes and steamers at Buffalo and Bergen, we sought out different vendors to put together a little platter of artisan goodies for our dinner later in the evening.  Our first stop was Red Apron Butchery, where we selected a variety of cured meats for our platter.  The second stop was Oh! Pickles,  a cool spot to find all kinds of pickles.  We then picked up some fresh made apple turnovers from DC Empanadas. Since we were sticking to a particular theme for the dinner platter, we'll have to try the actual empinadas another time.


Righteous Cheese
One of my favorite stops was Righteous Cheese, a fabulous cheese artisan who helped me find just the fight right cheeses for our platter. This is a great little spot where you can get a seat at the counter and order a flight of cheese with wine parings.  In fact, this market has several bars operating in conjunction with the food offerings, so it is definitly popular with younger, no kids set. 

If you haven't had a chance to stop by, or like me up until last week hadn't even heard of it, I highly recommend taking a trip to this fabulous market.  It is my new favorite food destination!