Tuesday, June 13, 2017

Roasted Garlic and Kale Pesto


1 small head of garlic

1 T olive oil

Salt and pepper

I large bunch Lacinto kale, washed and dried, stems removed and chopped in large pieces

1/3 cup chopped walnuts

1 cup shredded Parmesan cheese

1/2 cup olive oil

2 T lemon juice

1 teaspoon salt

1/2 teaspoon pepper


Preheat the oven to 375°F. Place a 12x12 piece foil on a baking sheet.  Pour 1 T olive oil into center of sheet and season with salt and pepper. Cut the stem end off the head of garlic and place cut side down in the olive oil.  Tent the foil around the head of garlic and seal all edges.  Bake for 35 minutes.  Remove from oven and open foil to cool.

Add all ingredients together in a food processor or blender.  Blend until desired consistency, adding more olive oil as needed.

Serve over your favorite pasta.

Monday, February 9, 2015

Italian Baked Chicken with Potatoes


I have a new and very easy, practically one pot dish to share with you today.  What I love about this dish, besides the ease of it, is the lack of pasta. Now don't get me wrong, I LOVE pasta, but really it's my downfall so something that allows me to enjoy a good red sauce without the temping issue of eating too much pasta is a good thing.

I found this recipe on Pinterest.  Well not really, I found the inspiration for this dish on Pinterest.  I was food surfing and came across a temping picture of a dish call Italian Baked Chicken with Potatoes and Tomatoes or something like that.  One look at the pic and I decided I knew how I thought it should be made.  Well it wasn't, it had Italian dressing in it and tomatoes over tomatoes. In fact mostly it wasn't what I pictured at all, so I went a head and created my own recipe.

Italian Baked Chicken with Potatoes

INGREDIENTS

Olive oil
5-6 chicken thighs
1 med onion sliced
5 cloves garlic, peeled left whole
Salt and pepper
Garlic salt
5 medium size potatoes, peeled and cubed
28 oz crushed tomatoes
1/3 cup Marinated Artichoke Hearts, quartered
Basil
Oregano
8 oz mozzarella cheese, thickly sliced and torn into pieces

INSTRUCTIONS

Preheat oven to 425 degrees

Place chicken, onions and garlic in long casserole dish. Drizzle generously with olive oil. Season to taste with salt, pepper and garlic salt. Brown in the oven for 20 minutes. Remove the pan from the oven and reduce the temperature to 350 degrees.

Meanwhile boil the potatoes until slightly tender, about 10 minutes. Drain and season with salt.

Remove the chicken from the pan. Smash the garlic and add the crushed tomatoes.  Stir to blend.  Add the potatoes and then place the chicken back in the pan nestled between the potatoes. Do not cover with the sauce. Place the artichoke pieces throughout the pan, also nestled in the sauce. Sprinkle basil and oregano across the top to taste.

Return the pan to the oven and bake uncovered for 30-40 minutes or until chicken is cooked through and potatoes are tender.

Remove the pan from oven and layer the cheese on top of the potatoes and artichokes, but not the chicken, then bake another 5 minutes or so until the cheese is melted. Let rest for about 10 minutes before serving.


Monday, January 19, 2015

Roasted Beet Hummus


It's the end of football season, the only part of the season that I actually get into, except maybe the very start of the season.  Okay yes, I am a fair weather fan, so I hope by the time we get to playoffs there is at least a team or two on my short list of faves still in the running.

You see for me it's not so much about the football, the football just serves as the event.  For me, it's about the food.  I try to keep it in line, just a few choice items, so they need to be good.  I certainly will make some killer nachos and wings, but I also feel I need something in the offering that is, dare I say it, on the healthy side.  What!? I know.  Anyway, this cool looking hummus served with veggies and baked chips fills that need perfectly.  

Now go grab a beer and start cheering!        

Roasted Beet Hummus

1 medium  beet
1 head  garlic
15 ounces  garbanzo beans, canned -- rinsed and drained and peeled
2 tablespoons  tahini
2 tablespoons  fresh lemon juice
1/3 cup  olive oil
salt and pepper

Preheat oven to 400. Cut the end off the head of garlic, exposing the cloves, wrap in foil. Wrap the beat in foil, drizzled with a little olive oil, salt and about 1/2 teaspoon of water. Roast both for about 45 minutes.

Let the beet cool, then rub the skin off and roughly chop.  Put the beet in a food processor or blender, and pulse a few times. Open the garlic packet and squeeze it straight into the food processor.  Throw away the skins.

Add the peeled garbanzo beans, tahini, lemon juice, salt and pepper to taste and some of the olive oil and pulse.  Drizzle in the rest of the olive oil and add more if needed for consistency. Taste and season to your preference.

Serve with carrots sticks, cucumber slices and pita chips.

Thursday, January 8, 2015

Pepper Steak in the Slow Cooker


Juggling your kid's after school activities with serving a home cooked meal is not always easy. I see why fast food, carry out and frozen meals are popular, but I do my best not to go there often, so I need a better strategy.  One is my slow cooker. Once in a while I will make time in the morning to get something going for the whole day, but there are also other ways to make this kitchen tool work for you.

If the activity allows about 30 minutes at home before we head out, I like to put together something that will basically keep warm in the slower cooker such as taco meat, or something that needs simmer time.  That's where this recipe comes into play. I've posted a version of this recipe before, but this has been modified for the slow cooker.

It takes about 15 minutes of minutes of prep to get it into the crock pot and it's worth it. I'm not a big fan of putting raw meat in the slow cooker, taking a few minutes to brown your meat such as in this recipe yields much better results. Even with that extra step, this recipe for Pepper Steak can be put together quickly so it can simmer in the slow cooker for a few hours while you are gone.  Then when you return, you put on the water for the noodles, add a few last minute items and dinner is served! 

Pepper Steak With Egg Noodles

Serving Size  : 6    
 
1lb Flat iron or Sirloin steak steak -- cut into 1/8 inch strips
3 tablespoons  olive oil
1 onion -- sliced
1 Clove  garlic -- pressed
salt and pepper to taste
1/8 cup red wine
1 can  beef broth
2 tablespoons  Worcestershire sauce
1 green pepper -- thinly sliced
2 tablespoons  cornstarch
1/4  cup  water
3  tomatoes -- sliced into thin wedges
12 ounces  egg noodles

Brown meat in oil in large skillet. Add onions cook a minute or two longer, add garlic and then wine. Allow a a few minutes for the alcohol to cook off.  Add beef broth and Worcestershire sauce to meat. Move all to the slow cooker. Add the green pepper strips on top. Cover and set slow cooker on low for about 2 1/2 hrs.

Turn slow cooker up to high. Put the water on for the noodles.  Combine cornstarch and 1/4 cup water; stir into meat mixture. Add tomatoes. Cover and cook on high 5-15 minutes longer. Cook noodles according to package directions. Serve pepper steak over the noodles. 
                                    - - - - - - - - - - - - - - - - - - - 

Per Serving: 422 Calories; 13g Fat (26.9% calories from fat); 26g Protein; 51g Carbohydrate; 3g Dietary Fiber; 98mg Cholesterol; 501mg Sodium.  Exchanges: 3 Grain(Starch); 2 1/2 Lean Meat; 1 Vegetable; 1 1/2 Fat; 0 Other Carbohydrates.

Sunday, January 4, 2015

Chicken Tortellini Soup


This dish started out as a quick easy meal for a busy night.  Some chicken broth, frozen tortellini, onions, carrots, spinach, throw in some crusty bread and you've got dinner.  You know that's all fine and good, and while canned chicken broth may do in a pinch, I've gotten to the point where it wont do at all.  If you have the time, make your own.  It's very simple and is best done with the last of a roasted turkey or chicken, but when that's not what's in your fridge, take a few chicken wings and use those.  Lots of good skin and bones for flavor and just the right amount of meat for soup.

Okay I'm getting ahead of myself, so please don't let my food snobbery stop you from making this with canned broth. It still makes a easy and quick weeknight dinner.  But if you have the time, try it with homemade stock; you may never go back. In that case it's not a quick weeknight meal unless you happen to have homemade stock in the freezer, which I suggest.

Chicken Tortellini Soup

Stock
8 chicken wings or roasted chicken carcass
1 gallon water
1 onion roughly chopped
2 carrots roughly chopped
2 stalks celery roughly chopped
2 bay leaves
generous amount of salt and pepper
1/2 teaspoon sage or to taste
several fresh sprigs of thyme
3 cloves garlic smashed

Soup
2 tablespoons olive oil
1 small onion diced
6-8 cups stock or canned chicken broth
2 carrots peeled and sliced in 1/8 disks
3-4 cups fresh or frozen cheese tortellini
6-8 ounces fresh spinach roughly chopped
reserved chicken meat
freshly shredded Parmesan cheese for garnish


For the stock add all ingredients to a stock pot and bring to a low boil, turn down heat to low an allow to simmer.  After about 1 1/2 hours use a slotted spoon to pull out the chicken pieces,  Remove the meat and store it in the refrigerator for later.  Return everything else back to the pot.  Simmer a few hours longer.  Use a fine mesh strainer to strain the stock into another pot for the soup or to a large container for storage.  Discard all the material in the strainer. If you have time this is the best method because once the stock has cooled you can go back in and skim the solidified fat from the surface.

For the soup, in a large stock pot, saute onion in oil until soft.  Add the stock.(Note: if using canned broth add some sage, thyme, garlic etc to pump up the
flavor a bit). Add the carrots and bring to a boil.  Add the tortellini and simmer until the tortellini are done.  Add the spinach and chicken meat.  Once the spinach is limp turn off heat.  Let set until ready to serve.  Garnish with Parmesan and serve with some crusty bread,

Sunday, July 6, 2014

Zucchini Rolls-Ups


I know it's been a while; four months since my last post! It's not that I haven't been cooking, because of course I have, and I even have a few new favorites up my sleeve, but getting it together enough to post it is a whole other story.  I have at least two posts in me for now, so I'll give you this one and then maybe another one in a few days. I'm doing this one first because, well it's zucchini season and we all need some fresh ideas to use them all up, and second because it's my new favorite. I've made this twice in the past two days!

I made it for the first time yesterday.  A friend of mine was generous enough to let me part-take in her CSA box while she was out of town.  In the box was a wonderful assortment of goodies including two nice big zucchini, I also had three nice big zucchini already in my refrigerator at home.  They are like rabbits, they multiply fast this time of year.  Anyway, we were having a little pool party/pot luck so I decided to share the abundant amount of zucchini by making this dish.

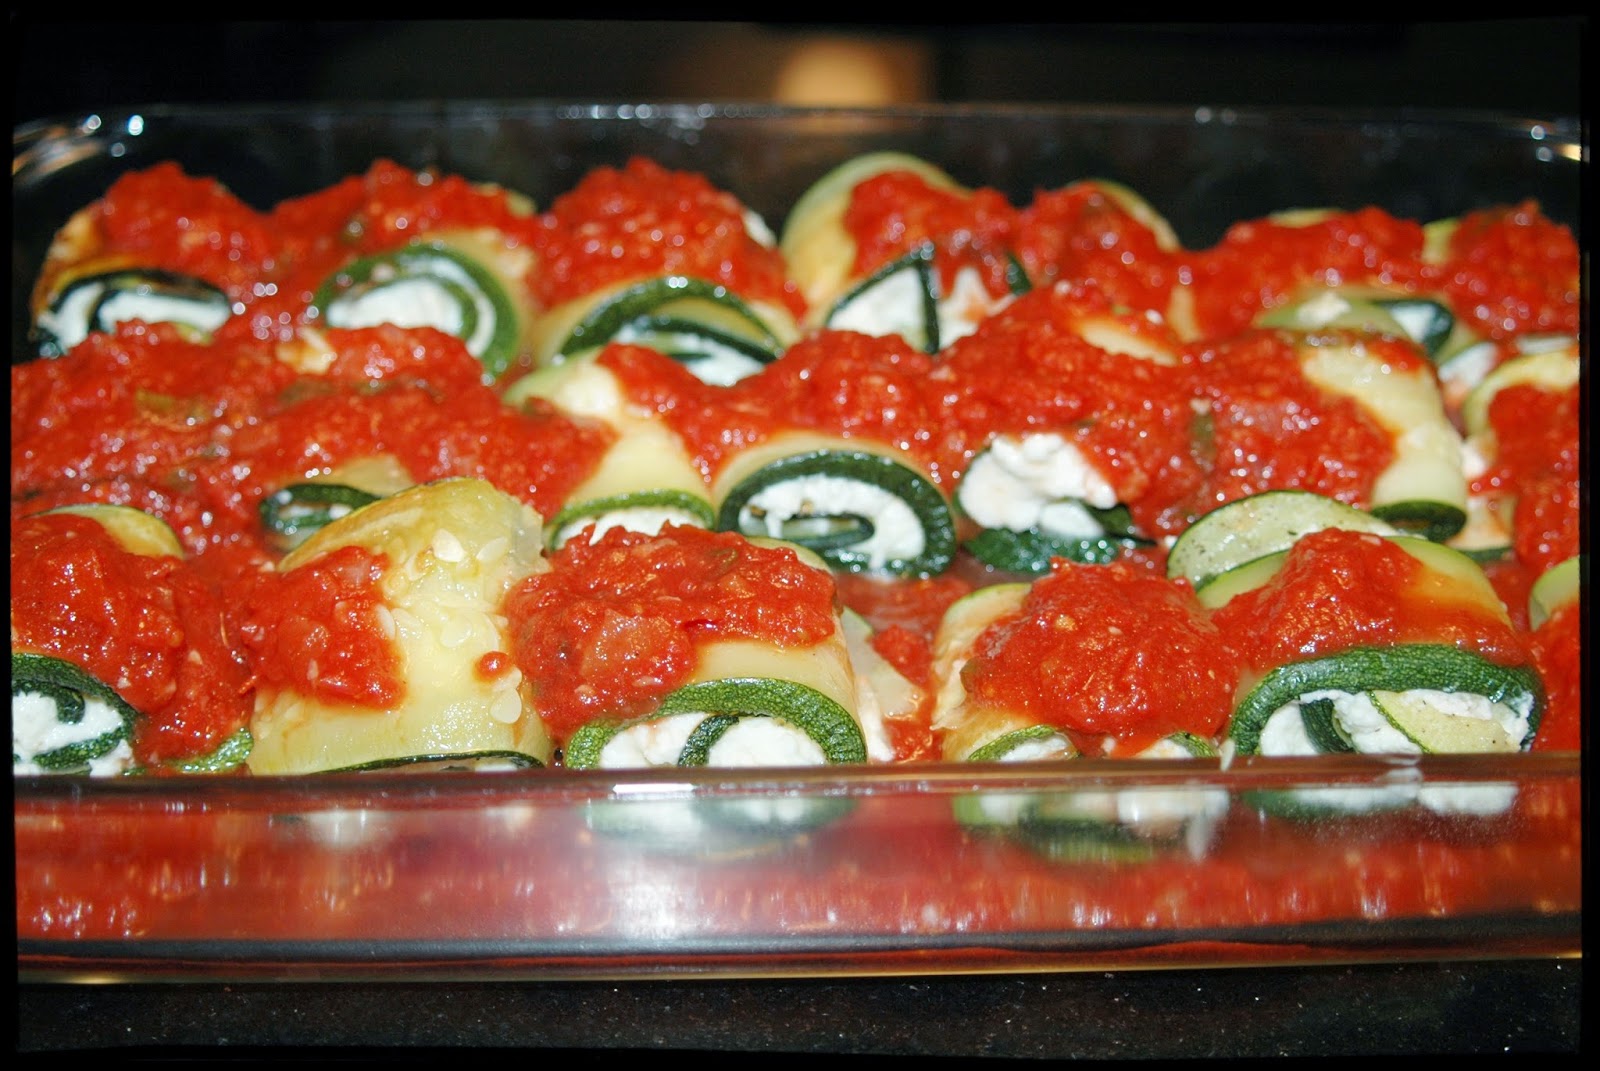
Basically, I wanted a lasagna roll up without the pasta.  At first I was going to make super thin slices of raw zucchini to make rolling easy, but then I began to worry about how much liquid the zucchini would put out as it baked.  I decided on thicker slices, baked in the oven to soften them for use. This was good plan, I like the flavor it gives the zucchini, plus there's more zucchini per roll. In the middle of it I thought, Wow! maybe this is better in theory than actually doing it, but they turned out great, so I'm glad I stuck with it.  I sliced the zucchini's by hand, but if you have a mandoline that will allow you to slice them the correct thickness, that would be the way to go.  In fact, I put my order in for one on Amazon today!

Zucchini Rolls-Ups

Serving Size  : 8

32 ounces  crushed tomatoes
4 cloves  garlic, crushed
2 tablespoons  olive oil
1 medium  onion
1/8 cup  red wine
salt and pepper
1/8 cup  fresh basil

4  Large zucchini squash

6  ounces  mozzarella cheese, cut into small pieces
15 ounces  ricotta cheese
3 ounces shredded parmesan cheese
1  large  egg

Prepare a basic tomato sauce. Saute onion in olive oil to soften, add the garlic and cook a minute longer.  Add the crushed tomatoes, red wine and fresh basil.  Simmer until ready to use.

Preheat oven to 425 degrees.  Slice zucchini lengthwise into 1/8 thick strips.  Spray a few sheet pans with cooking spray and lay the slices out in a single layer. Spray with cooking spray and season with salt and pepper. Roast zucchini strips for 15-20 minutes, until soft enough to roll. Pull the pans out and let them cool.

Meanwhile, combine mozzarella, ricotta, Parmesan and egg.  Season with salt and pepper. Set aside.

Preheat oven to 350 degrees.  Spray a shallow casserole dish with cooking spray and ladle in enough sauce to barely coat the bottom.  Spread a generous tablespoon or so of the ricotta mixture on to each zucchini slice.  Roll each piece up and place it in the casserole dish.  Once all pieces are rolled up, drizzle more tomatoes sauce on top.

Cover and bake 20 minutes.  Remove the foil and then bake 10 minutes longer or until bubbly.

Wednesday, March 5, 2014

Homemade Pasta


Don't you love it when you go to a wonderful Italian restaurant that serves fresh made pasta? I know I do and while I have spent years working on perfecting the various sauces that go on top of the pasta, it took some time for me to consider taking on the daunting task of making the actual pasta.

At first I started looking at fancy pasta making machines on line.  You know the kind where you put in all the ingredients and the machine works some sort of magic and spits out perfectly mixed and cut pasta.  Sounds fabulous right?  Well the reviews on these machines tell a different story.

About two years ago my husband gave me the Marcato Atlas Wellness 150 Pasta Maker. Working with this machine is a dream, although you wouldn't think so when you first see it.  One look at this machine and it seems like there is going to be a lot of work involved in making the pasta. It doesn't even make the dough!  That's okay, your food processor will make the dough.

Give it a try. It may not convert you from boxed pasta on busy weeknights; but set a side an hour on a lazy day to put it together, and you'll know the time was well spent.

Homemade Pasta


3/4 cups flour
3/4 cups semolina flour
3 eggs
1/2 tablespoon Kosher salt
olive oil
water

To make the pasta, put the two types of flour and salt in the bowl of a food processor with the chopping blade. Mix, adding one egg at a time until all eggs are incorporated.  Add about 1/2 teaspoon of each of olive oil and water, continuing to mix until a dough ball forms, adding a bit more olive oil and water as necessary, the ball should be pliable but not wet. If the dough is too wet add a little flour.

Divide the ball into 2 smaller balls and cover with a damp paper towel to keep dough from drying out.  Working with one ball at a time and using a pasta roller such as the Atlas Marcato set on "0", send the dough through the machine a dozen or so times until the dough has a silky texture  Store the sheet on a piece of parchment paper while you work on the other balls.  Once you have turned the two balls into two thick sheets of pasta, let the sheets rest about 10 minutes, covered with parchment paper.

After the pasta has rested, cut each sheet in half and working one piece at a time send them through the pasta roller set at "2" and then each level up to "6". Once the sheet is rolled through a "6," dust with a touch of flour then send the sheet through the cutting blade.  The basic Marcato comes with a blade that cuts pasta into spaghetti or fettuccini.   One cut, hang the pasta strips on a drying rack.  You can cook immediately, or dry it on the rack for an hour or so then place the dried pasta in zip lock bag and into the refrigerator to be used within three days.


Cook the pasta just as you would boxed pasta, just remember it doesn't need as much cooking time 2-4 minutes should do it.

Monday, March 3, 2014

Vietnamese Style Stir-fried Shrimp with Green Beans


I love Vietnamese food, although around here the selection is very limited.  We have a number of good places to choose from, but it's mostly Pho and grilled shrimp or chicken or whatever over rice or vermicelli.  Oh and don't forget the spring and summer rolls!  The first time I decided to make a bun dish at home I was amazed at the ingredients in the sauce that is used widely in Vietnamese food.  It's a combo of fish sauce, garlic, lime juice, and sugar, depending on the recipe there may be chilis or carrots added to it.  Thus I purchased my first of many bottles of fish sauce, something that on it's own still seems quite, well yucky.

This dish and many other fabulous dishes rely on this yucky fish sauce, which when incorporated gives a flavoring that cannot be duplicated. I do a lot of stir-fry in our house.  Basically it's a great way to make a fast flavorful dish with good veggies incorporated.  The problem is, I do same basic stir-fry over and over.  Oh yes, I change the meat the selection of veggies, but I basically use the same seasonings.  What I like about this dish is the flavor that the fish sauce and oyster sauce give to it.  It's not my regular stir fry.

Vietnamese Style Stir-fried Shrimp with Green Beans

1 cup jasmine rice
1/2 tablespoon cornstarch
1/4 cup water
1 1/4 lbs extra large shrimp, peeled and deveinded
3 tablespoon avocado oil
1 small onion, thinly sliced
2 jalapenos, chopped (keep seeds for more heat, discard for less heat)
3 cloves garlic, pressed
1 tablespoon fish sauce
1 tablespoon oyster sauce
1/2 cup chicken or vegetable broth
1/2 red bell pepper, thinly sliced
1/3 cup basil leaves cut into ribbons
juice of 1 lime

Put the jasmine rice and 2 cups water in rice cooker, set to cook.

Combine the corn starch and water and and stir until the corn starch is dissolved.  Pour over the shrimp, toss and set aside.

Heat the oil in a wok over high heat.  Add the onions and jalapeno, stir fry for about 30 seconds then add the garlic for another 10 seconds.   Add the shrimp and green beans, stir fry until the shrimp begin to turn pink about 4-5 minutes.  Add the fish sauce, oyster sauce and broth, cook and stir until the shrimp is cooked.  Add the bell pepper, basil and lime juice stir and then remove from heat.

Serve over jasmine rice.

Sunday, February 16, 2014

Old School Eggplant Parmesan


Many times when I make Eggplant Parmesan, I try to make a "healthier" version, one with less oil, no frying, more baking.  I will tell you that while those versions can be good and satisfy a craving for Eggplant Parmesan, they are nothing like the real deal old school version.  I made this version the other day, it was an occasion where shortcuts and substitutions were not to be taken, only the most authentic version would do.

I will now tell you that all those other versions are a fraud, there is nothing like this Eggplant Parmesan. Let your hair down once in awhile and go all the way.  This dish is worth it.

Old School Eggplant Parmesan

2 large Eggplants, cut into 1/4 inch thick slices
salt
4 large eggs, beaten
1 cup flour
olive oil
8 ounces fresh mozzarella cheese, grated
1 lb linguine

Basic Red Sauce

3 tablespoons olive oil
1/2 cup onion, finely diced
4 cloves garlic, finely chopped
84 ounces crushed tomatoes
1/4 teaspoon red pepper flakes
Salt and freshly ground black pepper to taste
1/2 teaspoon dried basil

1/4 cup red wine

Prepare the basic red sauce. Heat the olive oil in large pan, add the onion and saute until soft.  Add the garlic and cook a minute longer.  Add the crushed tomatoes and the remaining ingredients. Simmer until ready to use.

Lay the eggplant slices on two layers of per towels.  Salt the slices and then cover with another two layers of paper towels.  Let sit for 20 minutes.

Meanwhile, heat the olive oil over medium high heat in a large skillet.  Makes sure there is enough to cover the bottom of the whole pan.  Dip the slices of eggplant in the egg and then coat with the flour.  Fry the eggplant slices a few at a time, only fit as many in the pan as you can while maintaining a a single layer with a bit of space between each piece. It should only take few minutes on each side, just until  lightly browned. Drain on paper towels.

Preheat the oven to 425 degrees.  Spray a large casserole dish or two if needed with cooking spray.  Lay down one layer of eggplant slices.  Cover each slice with a a little bit of mozzarella, using about half.  Cover each slice with another slice of eggplant and then top each slice with the remaining mozzarella.  Bake for about 10 minutes.  Meanwhile cook the linguine.

Serve the eggplant with the linguine and top with the red sauce. Enjoy.


Sunday, February 9, 2014

Chocolate Coconut Bark


I know I've talked about coconut oil before, but I feel the need to do so again, and again. That's because this saturated fat used to get such a bad rap, I want to make sure the word is getting out.  I discovered coconut oil a few years ago to help me get off Pepcid and Prevacid.  I have awful acid and digestive issues that run in my family.  When I eat well, exercise and get a daily dosage of coconut oil these issues literally disappear.

What's more is that coconut oil being a medium chain fatty acid, gets used in your body much differently than other saturated fats.  It gets broken down in your system and instead of being stored as fat, it makes energy.  Something we can all use more of.  So what does this mean?  It means you are eating fat, but not getting fatter, in fact you are improving your metabolism and have a good shot of losing weight.  Yup that's what I said.  Google coconut oil and you'll see I am not making this stuff up!

So how much coconut oil should you have each day?  I think 1-2 tablespoons a day seems to do the trick. You can use it anywhere you use other oils, so you can start there.  Or you can swirl a teaspoon or so into your morning coffee or tea. Or you could make this awesome chocolate bark and get some extra antioxidants in at the same time.  This bark, like any other chocolate bark can take on all kinds of add ons.  This batch has pecans and dried cranberries, with a few mini marshmallows thrown in on part of it for my daughter.  It comes together fast and keeps well in the fridge.

Chocolate Coconut Bark

1/2 cup organic coconut oil
1/2 cup unsweetened cocoa powder
1/2 cup honey

add ons:
handful of dried cranberries
1/2 cup of chopped pecans
mini marshmallows

Line an 8x8 pan with parchment paper.

Over low heat in a small saucepan, heat the coconut oil until it melts.  Stir in the cocoa powder mixing well.  Once dissolved, add in the honey, cook and stir a few minutes longer then remove from heat.

Pour into the pan and top with your add ons.  Put the pan in the freezer for 30-60 minutes.  Remove from the freezer and break the bark into pieces.  Store in the refrigerator.

Sunday, February 2, 2014

Udon Noodle Soup with Poached Eggs and Spinach


This is a post from my old blog.  I've been craving this super-easy, but totally delish dish for a several days.  I'm putting it on the menu this week and thought I should share it with you.

I have a thing for udon noodles.  Okay, really all noodles, but udon noodles are so thick and yummy looking I find them hard to resist.  This is why I end up buying the instant udon soup bowls from Costco.  Granted these are not the healthiest items in the world, but with a bit of doctoring you can seriously up the protein and veggie count.  The sodium is high, so just don't have it everyday, or do what I do, drink up every last bit of broth.

I came back from yoga today looking for a fast lunch.  I saw the udon in the pantry and that was it, I had to have it. There's nothing like a good bowl of udon with some poached eggs on top.  Okay crappy carbs and good protein, what could I add?  I looked in the refrigerator and saw the bag of fresh spinach. Bingo! The addition of spinach would allow this meal to pass my "needs to be at least sort of healthy" requirement.

Since first posting this I have found that Costco doesn't always carry these noodle bowls.  You can find them at World Market.  I also go to HMart and there are tons of different brands of fresh udon or udon like noodle packets with seasoning in the refrigerator aisle.  If all else fails, use some ramen, it is not as hearty as udon, but it will be just fine.

Udon Noodle Soup with Poached Eggs and Spinach

Ingredients per serving:

Instant udon soup bowl
2 eggs
handful of spinach leaves
1 teaspoon or so hoisin sauce
sriracha sauce
water
white vinegar

Put on a small saucepan of water with a splash of vinegar and heat to almost boiling.  Meanwhile bring more water to boil for the soup.  Place the spinach leaves in a bowl.

When the soup water is ready, start the soup prep according to the directions. At the same time, reduce the heat to medium low on the pot with the water and vinegar.  Drop the eggs into the pot and poach for 2-3 minutes.  When the soup is ready pour it over the spinach in the bowl, stir in the hoisin sauce, drop the eggs on top and add sriracha to taste. 

Saturday, February 1, 2014

Baked BBQ Chicken Wings


Wings and football, they go hand in hand. But wings can be quite calorie laden.  I do two versions of baked wings to satisfy the craving for wings throughout the football season without tipping the scale too much.  This is my lazy version, it really couldn't get any easier.

I use parchment paper for this dish,  It helps with the cooking process as well as clean up.  Because believe me if you make these without the protection of the parchment paper, or if you don't have it, a sheet of foil, you will be sorry.

Baked BBQ Chicken Wings

Chicken wings, as many as you want, sectioned, tips removed
olive oil
salt and pepper
BBQ sauce of your choice ( I like Sweet Baby Ray's Honey BBQ)
blue cheese or ranch dressing for dipping, if that's your thing

Prepare your wings then put them in a zip lock bag. Drizzle a bit of olive oil over them and season with salt and pepper.  Shake the bag to coat all the wings. I usually do this ahead of time and let them sit in the refrigerator until I am ready cook them.

Preheat oven to 425 degrees.  Line an appropriate size pan or pans with parchment paper.  Make sure you leave room around each wing, or they wont get crispy enough. Start out with the wings skin side down.


Put the wings in the oven and bake for 20 minutes. Open the oven (do not turn the wings) and brush the top side with BBQ sauce.  Cook for another 10 minutes.  Open the oven, turn the wings, and brush the top side with BBQ sauce.  Cook another 10 minutes and they are done!


Wednesday, January 29, 2014

Pepper Steak with Penne


I've been making versions of this pepper steak for years.  It originally came from the back of some package, to which I would give proper credit, but the recipe is long gone and I can't remember the product.  That's okay, I think it's been morphed into my own thing anyway.

This dish is super easy and has wonderful fresh flavors due to the green peppers and tomatoes being added in at the end. It does take a bit of time though, you need to simmer the beef for over an hour before you can finish off the dish.  This is very important, otherwise the flank steak will tough rather than tender, and your fabulous dish will only be mediocre.


Pepper Steak with Penne

1 1/2  lbs flank steak, cut into 1/8 inch strips
2 tablespoons olive oil
salt and pepper to taste
1/2 cup onions, sliced
3 cloves garlic, pressed
2 each beef bouillon cubes
2 cups water
2 tablespoons Worcestershire sauce
1/4 cup  red wine
1 each  green pepper, sliced
2 tablespoons cornstarch
1/4 cup water
3 tomatoes, sliced
12 ounces penne pasta
1/4 cup fresh parmesan cheese, grated

In a very large skillet, brown the steak in the olive oil, season with salt and pepper then add the onions, cook until slightly tender.  Add the garlic and saute about 3 seconds longer.  Add the water, bouillon cubes, Worcestershire sauce and red wine.  Bring to a slight boil then turn to low and cover.  Simmer on low for about 1 and 1/4 hours.

Once the beef is tender, cook the pasta according to package instructions.

Add the green pepper to the beef and cook for 2 minutes.  Mean while mix the water and cornstarch together.  Add it to the beef mixture and stir until thickened.  Add the tomatoes and heat through.  Stir in the cooked pasta and top with grated Parmesan.


Saturday, January 25, 2014

Israeli Couscous with Red Pepper and Spinach


This is a quick and flavorful side dish to go with pretty much anything.  I paired it with the Parchment Roasted Salmon and some steamed spinach the other night. A meal with restaurant quality attention to detail and flavor was on the table in less than 30 minutes.

I've had a hard time finding time for the blog lately, but I knew I wanted to post about this dish.  As usual it was a dish on the fly and I didn't want to forget the details.  I was too lazy to go type the ingredients so I decided to send myself an email using voice technology.  Easier said than done.  When I said "chopped spinach" the voice technology interpreted it as "shop with kids" and then it interpreted " vegetable broth" as "see my bra". Yes, this could have been a very strange post indeed.

Israeli Couscous with Red Pepper and Spinach

1/4 cup diced onion
1 tablespoon olive oil
1 clove garlic, pressed
1/2 large red bell pepper, chopped
1 1/4 cups vegetable broth
1 cup Israeli couscous
2 handfuls fresh spinach, roughly chopped
Kosher salt and pepper to taste

In a medium pan with a tight fitting lid, saute onions in olive oil over medium heat until soft.  Add the garlic and saute 30 seconds longer. Toss in the red bell pepper and then add the vegetable broth. Raise the heat and bring the broth to a boil.  Add the couscous and stir.  Add the spinach on top and cover.  Cook 8-10 minutes stirring once or twice to incorporate the spinach.  Add salt and pepper to taste. Set a side for a few minutes before serving.

Friday, January 24, 2014

Parchment Roasted Salmon


Sometimes the simplest cooking ideas are the best. That's how I feel about this Salmon recipe. Nothing about it is earth shattering, except how fabulous it tastes.  

The trick to this recipe is the parchment paper. Parchment paper is one of my new favorite things. It seems to have made my mediocre cookies into great cookies, so I wondered would it do the same for my salmon recipe?  I know could cook this dish without it, and it would be quite tasty and good.  I also know clean up would be a bit of a pain. But besides the clean up, what would the parchment do for me?  Cooking fish using parchment isn't a new concept, but mostly it seems that folks like to wrap fish inside the parchment and basically steam it.  This is not what I was looking for. I wanted something more crispy and brown, something with a roasted rustic taste.  I got it. 

Parchment Roasted Salmon

1 1/2 lbs salmon about an inch thick

Marinade:
1-2 tablespoons olive oil
Juice of one lemon
1 clove garlic pressed
3/4 teaspoon chopped fresh rosemary
salt and pepper to taste

1 sheet of parchment paper

Combine the marinade ingredients.  Preheat oven to 450 degrees.  Set wire rack in boiler pan and then lay the parchment paper on top.  Place the fish on the parchment paper.  Pour the marinade over the fish and let is set for 10-15 minutes.


Put the pan in the oven and roast for about 10 minutes, then turn the heat on broil and brown for about 5 minutes or until the fish is cooked to your liking.