Showing posts with label Dessert. Show all posts

Sunday, February 9, 2014

Chocolate Coconut Bark


I know I've talked about coconut oil before, but I feel the need to do so again, and again. That's because this saturated fat used to get such a bad rap, I want to make sure the word is getting out.  I discovered coconut oil a few years ago to help me get off Pepcid and Prevacid.  I have awful acid and digestive issues that run in my family.  When I eat well, exercise and get a daily dosage of coconut oil these issues literally disappear.

What's more is that coconut oil being a medium chain fatty acid, gets used in your body much differently than other saturated fats.  It gets broken down in your system and instead of being stored as fat, it makes energy.  Something we can all use more of.  So what does this mean?  It means you are eating fat, but not getting fatter, in fact you are improving your metabolism and have a good shot of losing weight.  Yup that's what I said.  Google coconut oil and you'll see I am not making this stuff up!

So how much coconut oil should you have each day?  I think 1-2 tablespoons a day seems to do the trick. You can use it anywhere you use other oils, so you can start there.  Or you can swirl a teaspoon or so into your morning coffee or tea. Or you could make this awesome chocolate bark and get some extra antioxidants in at the same time.  This bark, like any other chocolate bark can take on all kinds of add ons.  This batch has pecans and dried cranberries, with a few mini marshmallows thrown in on part of it for my daughter.  It comes together fast and keeps well in the fridge.

Chocolate Coconut Bark

1/2 cup organic coconut oil
1/2 cup unsweetened cocoa powder
1/2 cup honey

add ons:
handful of dried cranberries
1/2 cup of chopped pecans
mini marshmallows

Line an 8x8 pan with parchment paper.

Over low heat in a small saucepan, heat the coconut oil until it melts.  Stir in the cocoa powder mixing well.  Once dissolved, add in the honey, cook and stir a few minutes longer then remove from heat.

Pour into the pan and top with your add ons.  Put the pan in the freezer for 30-60 minutes.  Remove from the freezer and break the bark into pieces.  Store in the refrigerator.

Tuesday, December 10, 2013

Chocolate Custard Pie


Oh, how I love pie.  Maybe that's what I want to be when I grow up, a pie-maker!  Not really because I hate making pie crust.  I always cheat and buy the kind in the refrigerated section that you can unroll into your own pan.  I like the texture better than the frozen ones, plus since it's in my pan, it seems more homemade.  Sure I can spin it that way.

Anyway, a friend of mine posted a pick of some chopped up chocolate the night before Thanksgiving. It was the beginning of a chocolate pie that she was making.  Ever since then I couldn't stop thinking about making one myself, a nice homemade pie with real chocolate.  In my house when I was growing up, chocolate cream pie was made with Jello brand pudding mix.  Nothing wrong with that mind you, but I wanted something really decadent.  I searched the web and looked at tons of recipes and found the items that seemed to be constant, then I added more chocolate.

Chocolate Custard Pie

1 unbaked pie crust,( I use the type in the refrigerated section that you unroll into your own pan)
2 ounce squares unsweetened baking chocolate
1 ounce square Semisweet baking chocolate
3/4 cup + 1/3 cup sugar
1/3 cup flour
1/4 +1/8 teaspoon salt
3 eggs, divided
1 1/2 cups 2 % milk
1 teaspoon vanilla
1 tablespoon butter

Preheat the oven to 350.

Chop the chocolate into small pieces to make it easier to melt.

Roll the pie dough into the pie pan and poke holes with a fork to let it vent.  Bake for about 20 minutes. Remove and set aside when cooked.

Meanwhile, mix chocolate, ¾ cup sugar, flour, ¼ t. salt, egg yolks and milk in a saucepan with a whisk. Cook over medium heat, constantly stirring until it simmers and thickens.  It should be nice and thick. Remove from the heat and whisk in vanilla and butter.

To make the meringue, start with a room temperature metal bowl, make sure there is nothing oily or greasy on your bowl or beaters.  Beat the egg whites with 1/8 t. salt until they get nice and white. Then add the sugar, beat until stiff peaks form.

Spread the chocolate custard into the baked pie shell, and then gently pour the meringue over top and spread to evenly cover the filling. Bake at 350, it until the meringue is lightly browned, about 10 minutes.

You can serve this warm, but I prefer to pop it in the refrigerator for a few hours then serve it.

Thursday, September 12, 2013

Cat Cake!


Today's post is a blast from the past.  This a straight copy from my previous blog that I wanted to share with Witchery followers. You may not have the need to make a cat shaped cake, but this post is more than that.  It shares a number of helpful cake baking and decorating tricks I learned that can applied to any cake.

This year my daughter wanted a kitty cat themed birthday party, so I decided that I would make a cat cake.  I feel that I am a pretty good cook, but only a mediocre baker.  Cakes are really not my strong point.  I decided I wanted my cake to look pretty good, so with only week to improve my cake building skills, I started my research.  My favorite bit of info came from a site called 5 min.  There were multiple videos from a master cake decorator.  So Gigi and I watched each video to pick up some important tips.  I also found a pattern for a cake cat made from two 8 inch rounds on the Betty Crocker site.

I decided a test cake using my new found knowledge would give me some practice.  I didn't want to make a cat because it would take some of the bang out the final cake.  I baked two 8 inch round cakes and quickly realized that these cakes were way too thin; they did not meet my vision of a nice thick cake.  That was fine I got to practice shaving off the uneven parts (which made it even thinner) and then put the layers together.  This cake ended up being a butterfly.

I bought two new 8 inch rounds that were much deeper than my other pans and decided to use two boxes of cake mix.  I know, all this trouble and I am making cake from the box!?  Well, I figured I had enough of a challenge on my plate without having to test cake recipes. 

The new rounds worked great although they did give me a bit a muffin top, so the top side needed to be shaved off.  Once I had my nice flat rounds, I used the pattern from Betty Crocker to cut out the tail, ears and head.  So far so good.

The next BIG thing I learned about cake decorating, is to do a crumb coat.  This is a thin layer of icing over the whole cake that seals in the crumbs.  This is the best tip ever.  Another tip I learned from some site, is to use Wilton Meringue Powder in your icing to help it harden just a bit.  I like this addition to the crumb coat icing, which was homemade, because it gave that crumb coat extra toughness.  I did have one small issue during this step.  The tip of one ear broke off.  I put some icing on it and "glued" it back on.

I put the cake in the refrigerator to set.  Once I felt it was firm, I mixed up some more Wilton Meringue Powder in some store bought chocolate frosting, and liberally frosted the whole thing.  This was going way better than I had expected.  I put it in the box and chilled it overnight.

 The next morning, I mixed up some pink icing.  Again store bought, but white.  I added some pink cake icing coloring and Wilton Meringue Powder.  I piped it on, put in some gum drops, added a bit of sugar glitter and I was finished! 

A lot of work went into the cake and I invested in some new tools, but I am glad I spent the time to study up and practice.  Now I no longer fear making a special cake.

Thursday, September 5, 2013

Chocolate Zucchini Bread


One of the great things about summer is the bounty of fresh veggies.  One of the worst things about summer is also the bounty of fresh veggies.  I love fresh veggies and I love to cook, but sometimes I get stuck in a rut. Sometimes I am just too tired to think of something new. The problem is the veggies are still sitting there demanding to be used before they spoil.

Zucchini is one of those veggies that everyone seems to have in great abundance this time of year, and even though I am so sick of it now I know I would kill to find a decent one at the grocery store in the winter. My daughter has been pretty good at eating the zucchini that has come across her plate, but she's getting sick of it too. Thank goodness for Pinterest. I surf there when I am board.  The other day there was a fat free, gluten free chocolate zucchini bread.  It looked good, but the fat free, gluten free part didn't float my boat.  I do like calorie reduced, but I need some fat.  In fact I thought a good chocolate zucchini bread would make a great vehicle to get some more coconut oil into our diet.

Once I am inspired to make something new I search the Internet to see what others have done.  Once I see what I like, I either combine a few recipes or just modify one.  I know you're asking why don't I just follow one recipe? I don't know, I just want it my way.  The one I used had some whole wheat flour, which if you like keep it, but as much as they say we are supposed to eat it, I don't like it so, I went for regular flour. Maybe next time I'll try and use half white whole wheat flour. My daughter doesn't like nuts so those got nixed (although I would have preferred to keep them). I wanted more cocoa and some brown sugar, and of course coconut oil. The other thing was I wanted it packed full of zucchini, so I used a lot. In fact when I folded it in it looked like a little batter with a lot of shredded zucchini, and I wasn't sure it was going to work. No worries, it came out great.

I made the bread and when my daughter got home from school she was enchanted by the scent of baked chocolate in the air.  I could have neglected to tell her about the zucchini part, but I'm not that kind of mom, so I immediately told her what it was. Ugh, really? was the response. Anyway she gave it a try and had seconds.  She also had a piece after dinner for desert.  Good stuff.

Chocolate Zucchini Bread
adapted from Eating Well's Chocolate Zucchini Bread

2 loaves , 8 servings each

1/4 cup coconut oil
1 ounce unsweetened chocolate, roughly chopped
2 cups all-purpose flour
1/3 cup unsweetened cocoa
1/2 teaspoon baking powder
1/2 teaspoon baking soda
1/2 teaspoon salt
3 large eggs, lightly beaten
1/2 cup brown sugar, packed
3/4 cup sugar
3/4 cup applesauce
1 teaspoon vanilla extract
2 cups zucchini – grated and packed


Preheat oven to 325°F. Spray two loaf pans with cooking spray.

Combine coconut oil and unsweetened chocolate in a microwave safe bowl.  Microwave for 15 seconds, stir, then repeat until the chocolate is melted.

In a large bowl combine flour, cocoa, baking powder, baking soda and salt.

In a medium bowl combine eggs, sugar, applesauce, vanilla and melted chocolate and coconut oil mixture. Add to the dry ingredients and stir until just combined. Fold in zucchini. Spoon the batter into the prepared pans, smoothing the tops.

Bake the loaves 40-45 minutes, or until the tops are golden and a toothpick inserted in the center comes out clean. Let cool in pans on a wire rack for 10 minutes. Invert onto rack and cool completely.


Nutritional Analysis from Mastercook

Per Serving: 190 Calories; 6g Fat (26.3% calories from fat); 4g Protein; 32g Carbohydrate; 2g Dietary Fiber; 40mg Cholesterol; 139mg Sodium.  

Friday, May 24, 2013

Blueberry-Rhubarb Upside-Down Cake


Last fall I signed up for a weekly vegetable box from my local CSA (Community Supported Agriculture). I did it for a number of reasons.

  • Participation in a CSA supports local farmers, take that Monsanto. 
  • I know that our food is local, this great for our environment. 
  • Being local the our food is probably picked the day before it gets to us, meaning it will last much longer in our refrigerator. 
  • The majority if not all of our veggies and fruit are organically grown.

All good reasons, but one of my favorite reasons is that the box contains what the box contains. There is no picking or choosing. This means we get stuff in the box that we never buy, sometimes it's something I've never even heard of.  This may be daunting to some, but I love it.  It's been good for our family; we have greatly expanded our repertoire of veggies. Which brings me to to today's recipe made with rhubarb.

Rhubarb is not new to me, I've seen it in the grocery store for years but never once purchased it.  This week it arrived in my veggie box. First of all is it a fruit or a vegetable?  Well I went to Wikipedia to get the answer and found that it seems to be both.  Well not really, it's a vegetable.  What is funny is that in 1947, a New York court deemed it a fruit since that is the way it is used in America.  Whatever, who am I to argue, I am using it as a fruit.

I was going to make rhubarb pie, but I have to admit I was afraid we might not like it, that's when I came across a recipe in Eating Well magazine for Strawberry-Rhubarb Upside-Down Cake.  I thought that sounded perfect, well almost, the hubby was never going to eating something made with strawberries and rhubarb, so I swapped out the strawberries for blueberries.  The results were awesome, this is a super easy homemade cake that takes very little effort.

The recipe below was taken directly from Eating Well with a few small changes, such as the blueberries.  I also used a different pan.  The whole inversion process of the upside-down cake is very intimidating to me, as it should be, I've mangled more than one of these in my time.  I used a springform pan which allowed me to safely remove the sides of the pan and the get the top (bottom) of the cake firmly on the plate before flipping it over. Another note, since I used a springfrom pan, some liquid seeped out of the bottom while it was in the oven, it didn't effect the results, but I would highly recommend putting a large baking sheet lined with foil on the rack below your pan to catch the drippings.

Blueberry-Rhubarb Upside-Down Cake
(Adapted from Eating Well's Strawberry-Rhubarb Upside-Down Cake)

1 cup sliced fresh rhubarb
3/4 cup orange juice, preferably fresh-squeezed, divided
3 tablespoons granulated sugar
2 1/2 cups blueberries
3 large eggs
2/3 cup extra-virgin olive oil
3/4 cup packed light brown sugar
1 tablespoon freshly grated orange zest
2 teaspoons vanilla extract
1 1/2 cups flour
2 teaspoons baking powder
1/2 teaspoon salt

Preheat oven to 350°F. Generously spray a springform cake pan with cooking oil. Combine rhubarb, 1/4 cup orange juice and granulated sugar in a medium bowl and let stand, mixing occasionally, for 20 minutes. Add blueberries; stir to combine. Spread the fruit mixture in the prepared pan.

Whisk eggs, oil, brown sugar, orange zest, vanilla and the remaining 1/2 cup orange juice in a large bowl. Whisk flour, baking powder and salt in a medium bowl. Gradually stir the dry ingredients into the wet ingredients. Do not overmix. Spoon the cake batter on top of the fruit mixture. the batter will seem thin, but it is fine.

Bake until a toothpick inserted in the center of the cake layer comes out dry, 40 to 50 minutes.

Run a knife around the outside of the pan and shake it a bit to loosen the bottom. Remove the sides of the pan and invert the cake onto a serving plate and remove the bottom. Let the cake cool to room temperature before serving, about 2 hours.


Saturday, March 16, 2013

Blueberry Pie

Usually my posts highlight a dish that I made, but not today.  The chef behind this wonderful blueberry pie is my nine year old daughter, Gigi.  Okay, yes it is my perfected recipe, but I cannot take credit for making the pie in these pictures.  What I love about blueberry pie, besides the luscious baked berry taste is the ease of this fresh fruit dessert.  There is no blanching, no peeling, no coring or seed removal, just look over your berries and rinse them and you are ready to go.

Now this being a cooking blog you would think we would make our own crust, but I have to confess, I find it much more trouble than it is worth.  I don't like the fact that store bought crust, and most homemade recipes for that matter, contain shortening which translates to trans fat, so maybe one day I'll work on a crust using coconut oil. But not today, the purpose of this post is talk about how fast and easy it is to get a semi-homemade fresh fruit pie into the oven, so using a store bought crust is perfect. 

The one thing we don't do is use frozen pie crust,the kind that comes in the aluminum pan, we like the type in the refrigerated section that you roll out into your own pan.  One, I don't think the frozen kind tastes as good and two, my glass pie plate is bigger, meaning more pie! This pie can go together in a matter of minutes, so get your ingredients together and put your nine year old to work!

Blueberry Pie
(adapted from Betty Crocker's Fresh Blueberry Pie)

1 package refrigerated ready made pie crusts
3/4 cup sugar (or a little less)
1/2 cup flour
1/4 teaspoon ground cinnamon
7 cups blueberries
1 tablespoon fresh lemon juice
1 1/4 tablespoons butter
1 teaspoon milk
1/2 teaspoon sugar

Preheat oven to 425°F. Unroll one pie crust and lay it into pie pan.  Press into the pan to fill the pan completely.

In large bowl, mix sugar, flour and cinnamon. Stir in the blueberries and lemon juice. Pour into pie crust. Cut butter into small pieces and sprinkle over the blueberries. 

Unroll the second pie crust over the top.  Press top and bottom edges together and crimp with a fork to seal.  Using a knife make small slits all over the top crust.  Brush top with milk and sprinkle with sugar.
 
Cover edges with foil strips to prevent excessive browning. Bake 35 to 45 minutes or until crust is golden brown and juice begins to bubble through slits in crust, removing foil for last 15 minutes of baking. Cool on cooling rack at least 2 hours.

Thursday, February 14, 2013

Glazed Flourless Chocolate Torte


I am breaking from tradition.  For a number of years now, I have baked a batch of luscious red velvet cupcakes for Valentine's Day. A semi-homemade affair, but they are soft, moist and delicious. For some reason this year, I am just not feeling it.  I got up this morning with red velvet cupcakes on my to do list, when all of the sudden it hit me.  I don't really want them and I mean really, if you are going to indulge in massive dessert calories, you should at least really want it. 

So the question for the morning became what do I want, and will it work for my 9 year old daughter who has come to expect red velvet cupcakes on Valentine's Day. I know I want something decadent and chocolaty, and realize the perfect treat would be a flourless chocolate torte, because who needs all that flour in there lightening up the chocolate flavor!  I casually ask Gigi if that would work for her, knowing it certainly would.

So after my trip to gym, I plan to head to the grocery store and pick up my ingredients.  I am really happy I decided to go to the gym, and I'm not talking about the part where I burn up enough calories to make up for ones I would consume with the torte.  Because really that would take all day. While I was there, I caught a cooking snippet on the Today show with a celebrity chef who was making a bunch of stuff that I was not interested in, but there was on thing she had that I did like.  She made these little heart shaped candies out of candy melts to add some bling to her dessert.  Okay, add a trip to Michael's to pick up candy melts and a mold.

A quick look through a cookbook and a web search gave me all the info I needed for my torte.  I found a recipe at About.com that would serve as my foundation.  I increased amounts because I had a larger pan and swapped out some of the semi-sweet chocolate for bittersweet. 

This torte is so easy to make, it may become one of my go to desserts, especially for a pot luck.

                     
Glazed Flourless Chocolate Torte

Serves 10

Torte
5 ounces  semisweet chocolate -- coarsely chopped
4 ounces  bittersweet chocolate -- coarsely chopped
3/4 cup  butter
1 cup  sugar
5 large  eggs
3/4 cup  cocoa
1 1/2 teaspoons  vanilla
                       
Glaze
3 ounces  semisweet chocolate -- coarsely chopped
2 1/4 tablespoons  butter
2 1/4 teaspoons  milk
2 1/4 teaspoons  agave syrup
1/4 teaspoon  vanilla

3 ounces  candy melts

Preheat oven to 350°F

Line the bottom of a 9 inch springform pan with parchment paper and spray the paper.

Put the 5 ounces of semi-sweet chocolate, 4 ounces of bitter sweet chocolate and butter in a microwave safe bowl. Melt in microwave stirring every 15 seconds until smooth.

Add sugar and return the bowl to the microwave for 3-4, 15 second intervals, until the sugar starts to dissolve.

Add each egg, one at time whisking thoroughly.

Sift the cocoa into mixture and whisk until incorporated. Stir in the vanilla.

Pour batter into prepared pan and bake in preheated oven for about 25 minutes. The center of the torte should be just firm to the touch, do not over bake.

Cool in the pan on a wire rack for 15 minutes, then remove the outside of the pan. The original recipe says to invert it, but I smell disaster so it will stay on the botton part of the springform pan.

Meanwhile melt the candy melts in the microwave 15 seconds at a time until smooth.  Pour into molds and refrigerate.

Put the remaining chocolate and butter in a microwave safe bowl. Melt in microwave stirring every 15 seconds until smooth.

Add the milk, agave syrup and vanilla and stir until smooth and glossy.

Let the glaze cool for a few minutes then pour over the middle of the torte.

Evenly spread the glaze over the cake, letting it run down the sides of the torte.

Decorate glazed torte with candies.
                                    - - - - - - - - - - - - - - - - - - -

Nutritional Analysis (from Mastercook)

Per Serving (Minus candy melts): 449 Calories; 33g Fat (59.8% calories from fat); 7g Protein; 43g Carbohydrate; 4g Dietary Fiber; 150mg Cholesterol; 208mg Sodium.  Exchanges: 1/2 Grain(Starch); 1/2 Lean Meat; 0 Non-Fat Milk; 6 Fat; 2 1/2 Other Carbohydrates.


Tuesday, February 12, 2013

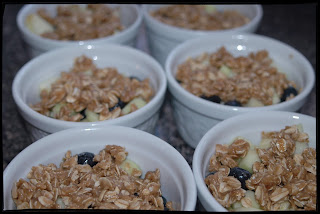
Blueberry Apple Crisps

My daughter has been off on a tangent lately about how we don't eat "regular food." This doesn't bother me because I know we eat well, meaning tasty foods that are usually on the healthier side of the spectrum. Don't get me wrong, we eat things that aren't necessarily healthy sometimes, especially because I think a wide variety of foods is important. But more and more the focus is on more fruits and veggies to balance out the less than healthy foods. Today's recipe is example of that balance, sure there is a good bit of sugar in here, but we also have fresh blueberries and oatmeal.

Yesterday she was sitting at the kitchen table making long work of her easy homework when she realized I was making something.  Of course she wanted to know what it was and I told her it was dessert for later. This got her attention and she jumped up to come over and check it out.  Even though she loves fruit, she saw the blueberries and apples in the bowl and decided it wasn't going to be her idea of dessert, and I got "why can't we have regular dessert?"

Well, first of all this isn't even something strange, it's just a fruit crisp. Second of all, this is one tasty dish. It's a modification of a recipe I pinned from about.com. For the most part I follow the recipe, but I do have a few modifications. First of all the original recipe is for blueberry crisp. I didn't have enough blueberries, but I did have a few granny smith apples, so I made up the difference with apple cubes roughly the same size as the blueberries. Second, although I have nothing against butter, I only used 2 tablespoons and then added in 2 tablespoons of coconut oil, because really, the more coconut oil I can get into our diet the better. Third, I like the fun and exactness of individual portions, and therefore put mine in 6 ramekins. Oh yeah, and I cut back on the sugar just a bit.

How did it turn out?  The dessert was hit. Gigi had to confess it might have been the best dessert ever. Yup, Score!


Blueberry Apple Crisp

Serving Size : 6

1 pint fresh blueberries - washed, drained well
2 medium granny Smith apples - peeled, cored and cubed
3/8 cup sugar
1 tablespoon cornstarch
1 teaspoon lemon juice
1/3 cup brown sugar
1/2 teaspoon cinnamon
1/3 flour
3/4 cup oatmeal
pinch kosher salt
2 tablespoons butter - softened
2 tablespoons coconut oil - softened


Preparation:

Preheat the oven to 375 degrees.

Combine the blueberries, apples, granulated sugar, corn starch, and lemon juice in a large bowl and mix to combine evenly. Divide fruit into lightly oiled individual ramekins.

In the same bowl, combine the remaining ingredients and stir together until the mix is evenly blended. Sprinkle the mixture over the fruit and bake for 20- 30 minutes.


Nutritional information form Mastercook:

Per Serving: 269 Calories; 9g Fat (30.0% calories from fat); 3g Protein; 46g Carbohydrate; 4g Dietary Fiber; 10mg Cholesterol; 47mg Sodium. Exchanges: 1 Grain(Starch); 1 Fruit; 2 Fat; 1 1/2 Other Carbohydrates.